How to schedule tasks in Plesk
This article describes how to configure scheduled tasks in Plesk. Using the task scheduler, you can:
- Run commands at intervals that you specify.
- Fetch URLs at intervals that you specify.
- Run PHP scripts at intervals that you specify.
Adding a scheduled task
To watch a video that demonstrates the following procedure, please click below:
To add a scheduled task to your account, follow these steps:
- Log in to Plesk.If you do not know how to log in to your Plesk account, please see this article.
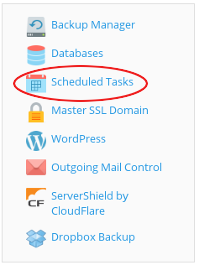
- In the right sidebar, click Scheduled Tasks:

- Click .
On the Schedule a Task page, in the Task type section, select the type of task that you want to set up:
- Select Run a command to use commands recognized by the Windows Command Center. In the Command text box, specify the command, as well as any optional arguments in the with arguments text box.
- Select Fetch a URL to retrieve a URL with similar functionality to the curl program. In the URL text box, specify the URL you want to fetch.
- Select Run a PHP script to run PHP scripts hosted on the server. In the Script path text box, specify the path to the script file, as well as any optional arguments in the with arguments text box. In the Use PHP version list box, select the PHP version you want to use to run the script.
- In the Run section, specify the frequency and time with which you want to run the scheduled task.
- In the Description text box, type a note or comment related to the scheduled task, or leave the text box empty.
- In the Notify section, select how frequently you want to receive notifications related to the scheduled task.
- To immediately run the scheduled task, click .
- To save the scheduled task, click .
Editing a scheduled task
To edit an existing scheduled task, follow these steps:
- Log in to Plesk.If you do not know how to log in to your Plesk account, please see this article.
- In the right sidebar, click Scheduled Tasks:

- Click the scheduled task you want to edit. Plesk displays the same Schedule a Task page that you used to create the task with all of the task's settings.
Removing a scheduled task
To remove a scheduled task from your account, follow these steps:
- Log in to Plesk.If you do not know how to log in to your Plesk account, please see this article.
- In the right sidebar, click Scheduled Tasks:

- Select the check box for the task or tasks you want to remove, and then click .
- Click to confirm the deletion. Plesk removes the task or tasks that you selected.
More Information
To view the official Plesk documentation about how to use the task scheduler, please visit http://docs.plesk.com/en-US/onyx/customer-guide/scheduling-tasks.65207.
Article Details
- Operating System: Linux Hosting
- Control Panel: Plesk
- Product: Managed WordPress with Plesk
- Level: Beginner
Grow Your Web Business
Subscribe to receive weekly cutting edge tips, strategies, and news you need to grow your web business.
No charge. Unsubscribe anytime.
Did you find this article helpful? Then you'll love our support. Experience the A2 Hosting difference today and get a pre-secured, pre-optimized website. Check out our web hosting plans today.