How to enable the LiteSpeed Cache crawler for WordPress
This article describes how to enable the LiteSpeed Cache crawler for your WordPress site.
Table of Contents
About the LiteSpeed Cache crawler
Using the crawler, you can ensure that LiteSpeed Cache has up-to-date versions of your pages in its cache ready to serve immediately to visitors. Without the crawler enabled, pages may take significantly longer to load, even though you are using a caching plugin. This is because after a page expires in the cache, the next visitor to the page must wait for LiteSpeed Cache to generate a fresh copy for the cache.
Enabling the LiteSpeed Cache crawler
To enable the LiteSpeed Cache crawler for your site, follow these steps:
- Log in to your WordPress site as the administrator.
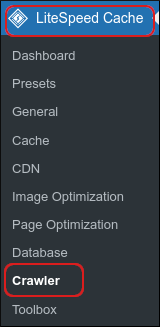
- In the left sidebar, click LiteSpeed Cache, and then click Crawler:

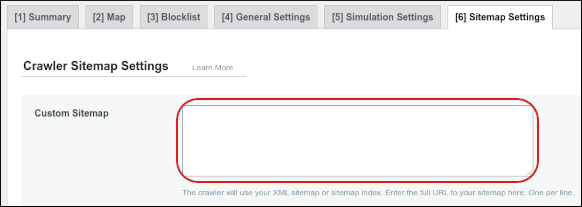
Click the Sitemap Settings tab:

In the Custom Sitemap text box, type the sitemap URL:
 The WordPress sitemap URL is typically https://example.com/wp-sitemap.xml, where example.com represents your domain name. However, some WordPress plugins use a different sitemap URL. Consult the documentation for your sitemap plugin if this is the case.
- Click Save Changes.
Click the General Settings tab, and then click the Crawler slider to ON:

- Click Save Changes.
Click the Map tab, and then click Refresh Crawler Map:

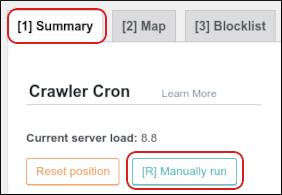
Click the Summary tab, and then click Manually run:

LiteSpeed Cache starts a new crawl process immediately.
Depending on the size of your site, this process can take a few hours.
Article Details
- Product: All accounts
- Level: Beginner
Grow Your Web Business
Subscribe to receive weekly cutting edge tips, strategies, and news you need to grow your web business.
No charge. Unsubscribe anytime.
Did you find this article helpful? Then you'll love our support. Experience the A2 Hosting difference today and get a pre-secured, pre-optimized website. Check out our web hosting plans today.