How to manage Professional and Pro Plus Email Hosting accounts
This article describes how to manage your Professional and Pro Plus Email Hosting accounts using the A2 Hosting Customer Portal. From the Customer Portal, you can do the following:
- Create and manage email accounts.
- Set up forwarders.
- Set up a catch-all address.
- Import email data from another server.
- Check the DNS status of your domain.
- Get the mobile app for Android and iOS devices.
- Set up DKIM (DomainKeys Identified Mail) for your domain.
- Get configuration information for third-party email client applications.
Table of Contents
- Accessing the management interface
- Creating an email account
- Managing an existing email account
- Setting up forwarders
- Setting up a catch-all address
- Importing email data from another server
- Checking the DNS status of your domain
- Getting the mobile app for Android and iOS devices
- Setting up DKIM (DomainKeys Identified Mail)
- Getting configuration information for third-party email client applications
Accessing the management interface
To access the management interface for Professional and Pro Plus Email Hosting accounts, you use the A2 Hosting Customer Portal. To do this, follow these steps:
- Log in to the Customer Portal.If you do not know how to log in to the Customer Portal, please see this article.
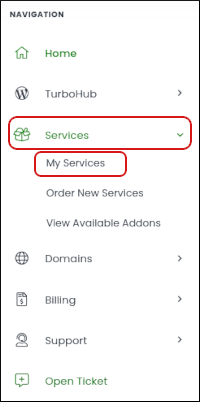
- In the Navigation sidebar, click Services, and then click My Services:

- Locate the Professional Email or Pro Plus Email service, and then click Manage:

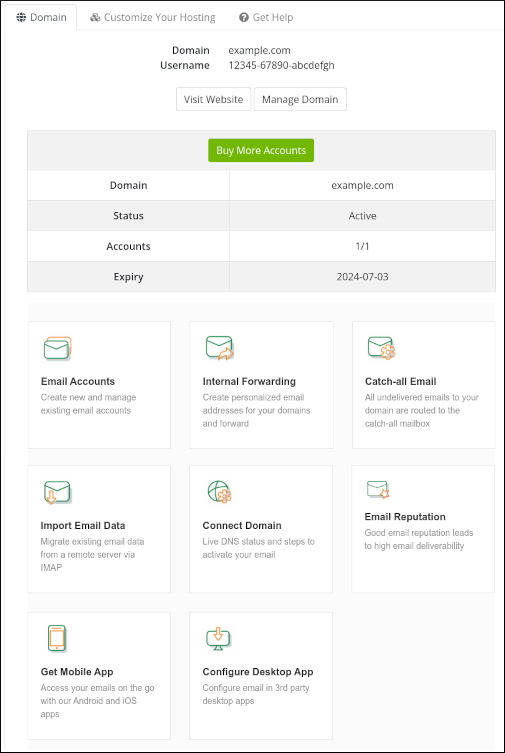
- On the Domain tab appear several options:

The following sections describe these options in detail.
Creating an email account
To create an email account, follow these steps:
- Click the Email Accounts icon:

Click Create new email account:

In the Email text box, type the username for the email account:
 To make the account an administrator account, select the Make this email account an admin check box.
In the Password section, type the password.
Alternatively, you can click Automatically generate password to automatically generate a random, strong password.- In the Password recovery email address text box, type an email address to be used if the user needs to reset his or her password.
- Click Create new account, and then click Done. The new account is ready to use.
Managing an existing email account
To manage an existing email account, follow these steps:
- Click the Email Accounts icon:

Under Email Accounts, locate the account you want to manage, and then click the three-dot icon:

Several options appear:
- Access Webmail: Select this option to access webmail for the account.
- Reset Password: Select this option to reset the password for the account.
- Manage Alias: Select this option to add an alias. Aliases enable you to use multiple e-mail addresses with one account. For example, if the primary email account is [email protected], you could add an alias [email protected], and the [email protected] account would receive any messages sent to [email protected].
- Disable Admin Rights / Make Admin: Use this option to grant or revoke administrative rights to the account.
- Suspend Account: Select this option to suspend the account. To unsuspend an account, in the account list, in the Status column, hover over Suspended, and then click Unsuspend.
- Delete Account: Select this option to delete the account.
Setting up forwarders
You can set up a forwarder to forward messages from one account to another. To do this, follow these steps:
- Click the Internal Forwarding icon:

- Click Create an internal forwarding account.
In the Forward mails from text box, type the username of the account from which you want to forward messages:

In the Forward to list box, type the destination email address for the forwarded messages.
You can forward messages to multiple email addresses if you want.- Click Create internal forwarding account.
Setting up a catch-all address
You can set up a catch-all address for your domain. A catch-all address “catches” e-mail messages that are sent to non-existent or invalid e-mail addresses on your domain. For example, normally if a customer sends a message to [email protected] instead of [email protected], the message is rejected (assuming, of course, that a [email protected] address does not actually exist). With a catch-all address however, this message is delivered to the e-mail account that is designated as the catch-all address.
To configure a catch-all address for your domain, follow these steps:
- Click the Catch-all Email icon:

- Click Enable catch-all mailbox.
In the Enter email address text box, type the email address where you want to receive the catch-all messages:

- Click Set this email as catch-all. The catch-all address is now active.
Importing email data from another server
You can import messages from another email account on a remote server. For detailed information about how to do this, please see this article.
Checking the DNS status of your domain
This section enables you to set up your domain for email, and check the current status of your domain's MX and TXT DNS records.
For detailed information about how to set up DNS records for your domain's email, please see this article.
Getting the mobile app for Android and iOS devices
To download the mobile app, click the Get Mobile App icon.
Setting up DKIM (DomainKeys Identified Mail)
DKIM (DomainKeys Identified Mail) helps ensure that your messages are delivered reliably to recipients.
For detailed information about how to set up DKIM for your domain, please see this article.
Getting configuration information for third-party email client applications
To view configuration information for third-party email client applications, such as IMAP and SMTP server settings, click the Configure desktop app icon.
Article Details
- Product: Email Hosting
Related Articles
- Changing your password in Professional and Pro Plus Email Hosting
- Importing contacts into Professional and Pro Plus Email Hosting
- Managing your email in Professional and Pro Plus Email Hosting webmail
- Setting up DKIM for Professional and Pro Plus Email Hosting
- Integrating Professional and Pro Plus Email Hosting accounts with Gmail
- Managing email signatures in Professional and Pro Plus Email Hosting
Grow Your Web Business
Subscribe to receive weekly cutting edge tips, strategies, and news you need to grow your web business.
No charge. Unsubscribe anytime.
Did you find this article helpful? Then you'll love our support. Experience the A2 Hosting difference today and get a pre-secured, pre-optimized website. Check out our web hosting plans today.