How to import email data to Professional and Pro Plus Email Hosting accounts
You can import messages from an email account on a remote server into your Professional or Pro Plus Email Hosting account. The process uses IMAP to access the remote account and transfer its messages over to the Professional or Pro Plus Email Hosting account that you specify.
- You have set up the DNS records for your Professional or Pro Plus Email Hosting account. For information about how to do this, please see this article.
- You have created at least one email account for your Professional or Pro Plus Email Hosting account. For information about how to do this, please see this article.
Table of Contents
Importing email data
To import email data using the A2 Hosting Customer Portal, follow these steps:
- Log in to the Customer Portal.If you do not know how to log in to the Customer Portal, please see this article.
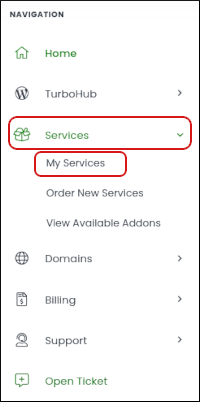
- In the Navigation sidebar, click Services, and then click My Services:

- Locate the Professional Email or Pro Plus Email service, and then click Manage:

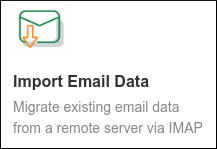
- On the Domain tab, click the Import Email Data icon:

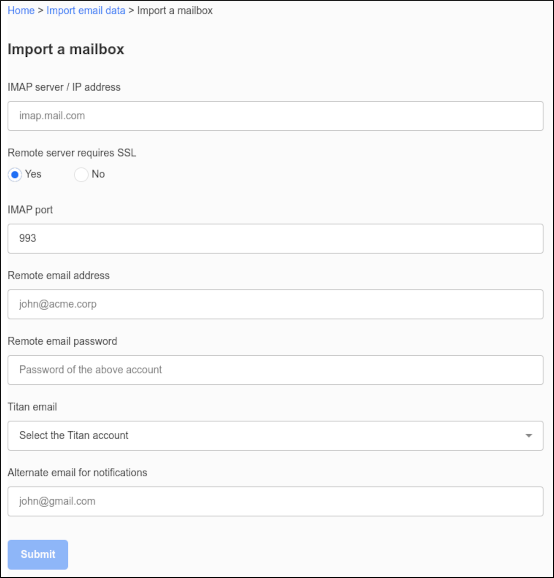
Click Import a mailbox. The Import a mailbox dialog appears:

- In the IMAP server / IP address text box, type the FQDN (fully qualified domain name) or IP address of the remote server (for example, imap.example.com).
- If the remote server requires an SSL connection, click Yes.
- In the IMAP port text box, type the IMAP port number on the remote server. The default value is 993.
- In the Remote email address text box, type the email address of the remote account that you want to transfer (for example, [email protected]).
- In the Remote email password text box, type the password for the account you specified in step 9.
- In the Titan email list box, select the account to which you want to transfer the email data.
- In the Alternate email for notifications text box, type a different email address where you can receive notifications regarding the email transfer.
- Click Submit. When the import process completes, you receive an email notification at the address you specified. The notification tells you if the import was successful or not.
Article Details
- Product: Email Hosting
- Level: Intermediate
Related Articles
- Importing contacts into Professional and Pro Plus Email Hosting
- Changing your password in Professional and Pro Plus Email Hosting
- Integrating Professional and Pro Plus Email Hosting accounts with Gmail
- Managing Professional and Pro Plus Email Hosting accounts
- Managing your email in Professional and Pro Plus Email Hosting webmail
Grow Your Web Business
Subscribe to receive weekly cutting edge tips, strategies, and news you need to grow your web business.
No charge. Unsubscribe anytime.
Did you find this article helpful? Then you'll love our support. Experience the A2 Hosting difference today and get a pre-secured, pre-optimized website. Check out our web hosting plans today.